Monday, October 9, 2017

Upgrade to Oracle Database 12.2 – New Metalink/MyOracleSupport Notes

MOS Note: 2173141.1
Complete Checklist for Manual Upgrades to non-CDB Oracle Database 12.2
MOS Note: 2173144.1
Complete Checklist for Manual Upgrade for Multitenant Architecture Oracle Databases from 12.1. to 12.2.
MOS Note: 2189854.1
Complete Checklist for Upgrading to Oracle Database 12.2 using DBUA
Furthermore check regularly for Known Issues and Alerts – currently the note has no content but exists already:

MOS Note: 2239820.1
12.2.0.1 Base Release – Availability and Known Issues

SRVCTL add database fails with osdbagrp error

I ran into below issue when trying to add a manually created RAC db to CRS. The issue seems to be caused by missing SS_ASM_GRP in config.c. I cloned the Database oracle home of a single node DB to RAC oracle home, as i was trying to avoid applying oneoff patches required on top for Oracle E-Business Suite. This seems to have caused missing ASM group entry in config.c

You can fix it by following below action plan.


$ srvctl add database -d EBSDB -o /u01/app/11.2.0/ebs -p +EBS/spfileEBSDB.ora -c RAC -a EBS
PRCR-1006 : Failed to add resource ora.ebsdb.db for ebsdb
PRCT-1011 : Failed to run "osdbagrp". Detailed error: null

$ cd $ORACLE_HOME/rdbms/lib
$ cp config.c config.c.30apr
$ vi config.c

#define SS_DBA_GRP "oinstall"
#define SS_OPER_GRP "oinstall"
#define SS_ASM_GRP ""

char *ss_dba_grp[] = {SS_DBA_GRP, SS_OPER_GRP, SS_ASM_GRP};

$ rm -f $ORACLE_HOME/rdbms/lib/config.o
$ make -f $ORACLE_HOME/rdbms/lib/ins_rdbms.mk $ORACLE_HOME/rdbms/lib/config.o
$ cd $ORACLE_HOME/srvm/lib
$ make -f ins_srvm.mk iosdbagrp

$ srvctl add database -d EBSDB -o /u01/app/11.2.0/ebs -p '+EBS/spfileEBSDB.ora' -c RAC -a EBS
$ srvctl add instance -d EBSDB -i EBSDB1 -n balla-rac1
$ srvctl add instance -d EBSDB -i EBSDB2 -n balla-rac2

$ srvctl start database -d EBSDB
$ srvctl status database -d EBSDB
Instance EBSDB1 is running on node balla-rac1
Instance EBSDB2 is running on node balla-rac2

Merging Apps patches in Oracle EBS R12.2

It’s public knowledge that the traditional patching tool in Oracle EBS “adpatch” is replaced with “adop” utility. Its also known that adop utility automatically merges patches when more than one patch is specified in the command line arguments. So whats the need for blog post on merging patches when its taken care automatically?

This blog is for people who like to dig little deep into EBS to shave off some downtime during the upgrades. We save some downtime if we merge the patches ahead of time instead of letting adop do it during the upgrade window. This is especially true when you are applying big patches like 12.2.4.

Merging patches is done using same utility as in earlier versions called “admrgpch”. Except that there are few extra steps needed after merging the patches.

In EBS 12.2 after merging the patches using admrgpch, we need to copy the actual unzipped patches that we merged also into the destination  directory. This is required as adop utility seems to be looking for these patches during the prepare phase. If you don’t copy the unzipped patch directories, you can still apply the patches. But when you run adop=prepare during next patching cycle,  it will fail as it will look for actual patch directories inside the merged patch dir.

Here is how a sample merging procedure will look like in EBS R12.2

# merge patches 111111 & 222222
$ pwd
  /u01/EBS/fs_ne/EBSapps/patch
$ ls
  111111 222222 
$ mkdir dest
$ admrgpch -s /u01/EBS/fs_ne/EBSapps/patch -d /u01/EBS/fs_ne/EBSapps/patch/dest
$ cd dest
$ pwd
  /u01/R122_EBS/fs_ne/EBSapps/patch/dest
$ ls
  fnd u_merged.drv 

# After admrgpch is finished, we need to copy patch directories into the dest dir

$ cd ..
$ mv 111111 /u01/EBS/fs_ne/EBSapps/patch/dest
$ mv 222222 /u01/EBS/fs_ne/EBSapps/patch/dest
$ cd /u01/EBS/fs_ne/EBSapps/patch/dest
$ ls
  111111 222222 fnd u_merged.drv

# Now you can the patches using adop=apply

Migration of Alerts in R12/11i

1] Using FNDLOAD utility:
Here first DOWNLOAD the custom alert from the source instance, copy the ldt file to the new instance and then UPLOAD to the destination instance.
Command to download:
FNDLOAD apps_user_name/apps_password 0 Y DOWNLOAD $ALR_TOP/patch/115/import/alr.lct my_file.ldt ALR_ALERTS APPLICATION_SHORT_NAME=’XXCUST’ ALERT_NAME=<Alert name to download>
Here are some additional parameters that can also be passed are: 
ALR_DISTRIBUTION_LISTS
ALR_LOOKUPS 
ALR_MESSAGE_SYSTEMS 
ALR_ORACLE_MAIL_ACCOUNTS 
ALR_PROFILE_OPTIONS 
ALR_PERIODIC_SETS
Command to upload:
FNDLOAD apps_user_name/apps_password 0 Y UPLOAD  $ALR_TOP/patch/115/import/alr.lct my_file.ldt – CUSTOM_MODE=FORCE

2] Using Alert Manager Responsibility:
You can use the Transfer Alert Definitions window to transfer an alert definition to another database, or make a copy of an existing alert. 
1. From the Menu, choose Tools > Transfer Alert.
2. In the Source Alert block of the Transfer Alert Definition window, enter:
* Application name associated with the alert to be transferred
* Alert name to be transferred
* Username and password for the database where the Alert to transfer resides
Include any necessary SQL*Net syntax to indicate where your database resides. 
SQL*Net syntax may be used. The different databases need to be defined in the
$TNS_ADMIN/tnsnames.ora file.
Example of: username/ password@ SQL*Net_syntax
sysadmin/friday@T:testing:db2
sysadmin/friday@db2
Note: Database Links are not supported in Applications
3. Similarly, in the Destination Alert block, enter:
* Application name for the new Alert. 
* Alert name for the new Alert. 
* Username and password for the new database location.
4. Click Transfer button to complete the alert transfer.
NOTE: This process works for NEW Alerts that do not exist. If the Alert exists already in the Destination location, you will receive the error:
APP-ALR-04016: The alert <alert_name> already exists on the destination database account.
Reference:
§  Oracle Alert User’s Guide
§  How to transfer alert definition from One Instance to another instance using cmdline script [ID 400295.1]


Creating Periodic Alert to send emails in R12/11i

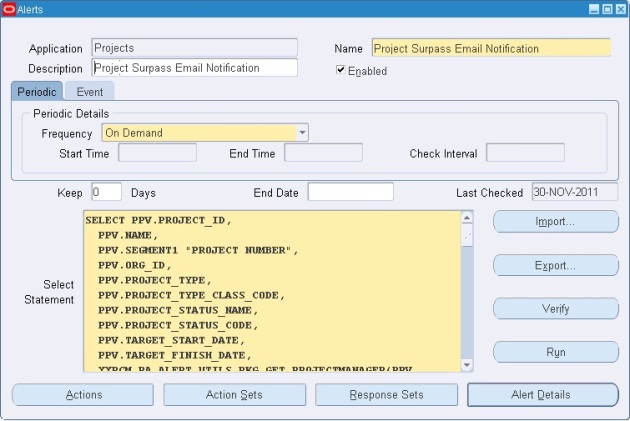
1] Go to ‘Alert Manager’ responsibility and navigate Alert > Define.
  • Enter the name of the application that will own the alert
  • Enter a suitable Name of the alert (up to 50 characters), and give it a meaningful description (up to 240 characters).
  • Select a frequency for your periodic alert. You can choose from nine frequency options:
  1. On Demand
  2. On Day of the Month
  3. On Day of the Week
  4. Every N Calendar Days
  5. Every Day
  6. Every Other Day
  7. Every N Business Days
  8. Every Business Day
  9. Every Other Business Day
  • Choose ‘On Demand’ frequency when you are developing a periodic alert so that you can test your alert at any time you want. When you will sure that the alert is working fine, then you can change the frequency as per business need.
  • Depending on the frequency you choose in the previous step, the Start Time and End Time fields become enabled.  You may also specify the number of times within a 24-hour period that Oracle Alert checks your alert.
  • Specify a value in the Keep _ Days field to indicate the number of days of exceptions, actions, and response actions history you want to keep for this alert.
  • Specify a value in the End Date field if you want to disable your alert by a certain date.
  • Enter a SQL Select statement that retrieves all the data your alert needs to perform the actions you plan to define.
Note:
  • Your periodic alert Select statement must include an INTO clause that contains one output for each column selected by your Select statement.
  • Identify any inputs with a colon before the name, for example, :INPUT_NAME.
  • Identify any outputs with an ampersand (&) before the name, for example, &OUTPUT_NAME.
  • Do not use set operators in your Select statement.
  • You can use PL/SQL functions in your Select statement to fetch complex business logic.
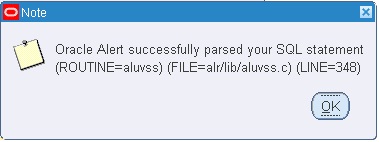
Click on the ‘Verify’ button to check the select statement is correct.
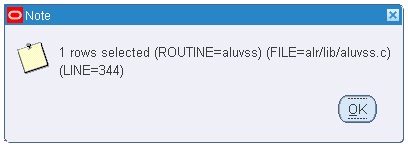
Click on the ‘Run’ button to execute the Select statement.
Once you are satisfied with the SQL statement, save your work.
2] You can view all the input and output column details in ‘Alert Details’ Tab. The Alert Details window includes information such as which Application installations you want the alert to run against, what default values you want your inputs variables to use, and what additional characteristics you want your output variables to have.
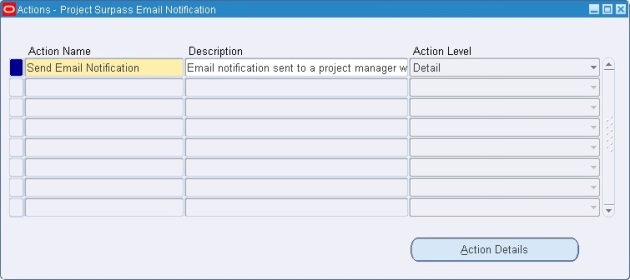
3] After you define your alert you need to create the actions you want your alert to perform. For that click on the ‘Actions’ tab.
  • Enter a name (up to 80 characters) and description (up to 240 characters) for your alert action.
  • Select a level for your action: Detail, Summary, or No Exception.
  1. Detail action: performs once for each individual exception found
  2. Summary action: performs once for all exceptions found
  3. No exception action: performs when no exceptions are found.
4] Click on ‘Action Details’ tab to display the Action Details window.
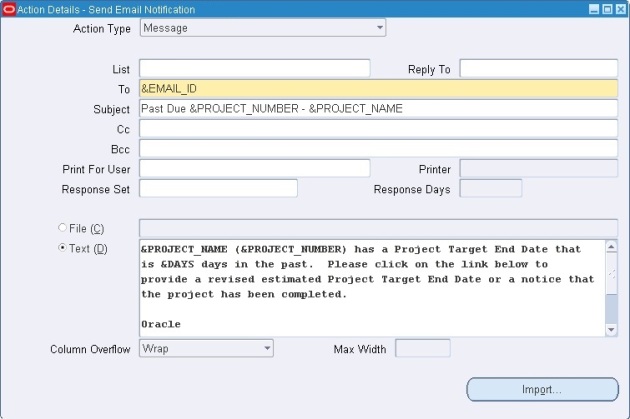
  • Select the Action Type field as ‘Message’ if you want to send emails. Other action types are: Concurrent Program, Operating System Script and SQL Script.
  • Specify the electronic mail IDs of the recipients you want to send your message to in the To field.
  • If you list more than one recipient in any of these recipient fields, separate each recipient by a space, or a comma, or a combination of the two.
  • You can enter as many recipients as you want, up to 240 characters.
  • You can also enter alert outputs or response variables in any of the alert detail fields. Oracle Alert automatically substitutes the associated output value when checking the alert or the associated response variable value when reading the response.
  • Save your changes.
5] Click on ‘Action Sets’ tab in the main Alert Window.
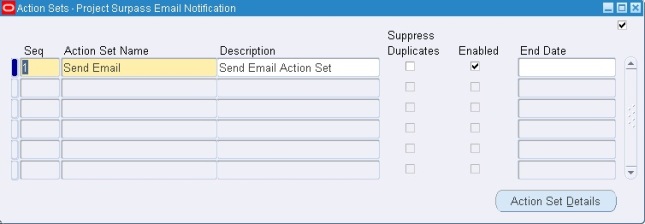
  • Once you create your alert actions, you must include them in an enabled action set for Oracle Alert to perform during an alert check. An action set can include an unlimited number of actions and any combination of actions.
  • Enter a Sequence number that lets you order the execution of action sets during an alert check.
  • Give any suitable name and description.
  • Check Suppress Duplicates if you want Oracle Alert to suppress the actions in this action set if the exception found is a duplicate that occurred during the last alert check.
6] Click on ‘Action Set Details’ tab.
  • Go to ‘Members’ tab.
  • Find and attach the action that is created in Step 3.
  • Save the changes. 
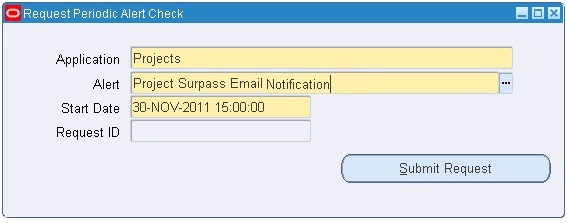
7] Since it is an ‘On Demand’ periodic alert, we can run the alert at any time we want. For that go to Request > Check and enter the alert details. Then click on ‘Submit Request’.
  • This will fire one concurrent program which you can view by going through the navigation:  Request > View
  • View the Log and Output files of the concurrent program to find that the alert is fired successfully.
Done…check your mailbox and you should get emails that are sent from Oracle Alerts.

Tags:-
 ALERT MANAGERORACLE ALERTSPERIODIC ALERT

Standard Utility APIs for Concurrent Processing - R12/11i

FND_CONCURRENT.GET_REQUEST_STATUS

This API Returns the Status of a concurrent request. It also returns the completion text if the request is already completed. The return type is Boolean (Returns TRUE on successful retrieval of the information, FALSE otherwise).
1
2
3
4
5
6
7
8
function get_request_status(request_id     IN OUT NOCOPY number,
                    appl_shortname IN varchar2 default NULL,
                    program        IN varchar2 default NULL,
                    phase      OUT NOCOPY varchar2,
                    status     OUT NOCOPY varchar2,
                    dev_phase  OUT NOCOPY varchar2,
                    dev_status OUT NOCOPY varchar2,
                    message    OUT NOCOPY varchar2) return boolean;
The parameters are:
  • REQUEST_ID: Request ID of the program to be checked.
  • APPL_SHORTNAME: Short name of the application associated with the program. The default is NULL.
  • PROGRAM: Short name of the concurrent program. The default is NULL.
  • PHASE: Request phase.
  • STATUS: Request status.
  • DEV_PHASE: Request phase as a string constant.
  • DEV_STATUS: Request status as a string constant.
  • MESSAGE: Request completion message.

FND_CONCURRENT.WAIT_FOR_REQUEST

This API waits for the request completion, then returns the request phase/status and completion message to the caller. It goes to sleep between checks for the request completion. The return type is Boolean (Returns TRUE on successful retrieval of the information, FALSE otherwise).
1
2
3
4
5
6
7
8
function wait_for_request(request_id IN number default NULL,
        interval   IN  number default 60,
        max_wait   IN  number default 0,
        phase      OUT NOCOPY varchar2,
        status     OUT NOCOPY varchar2,
        dev_phase  OUT NOCOPY varchar2,
        dev_status OUT NOCOPY varchar2,
        message    OUT NOCOPY varchar2) return  boolean;
The parameters are:
  • REQUEST_ID: Request ID of the request to wait on. The default is NULL.
  • INTERVAL: Number of seconds to wait between checks. The default is 60 seconds.
  • MAX_WAIT: Maximum number of seconds to wait for the request completion. The default is 00 seconds.
  • PHASE: User-friendly Request phase.
  • STATUS: User-friendly Request status.
  • DEV_PHASE: Request phase as a constant string.
  • DEV_STATUS: Request status as a constant string.
  • MESSAGE: Request completion message.
There are few other useful apis too.
  • FND_CONCURRENT.SET_COMPLETION_STATUS: Called from a concurrent request to set its completion status and message.
  • FND_CONCURRENT.GET_REQUEST_PRINT_OPTIONS: Returns the print options for a concurrent request.
  • FND_CONCURRENT.GET_SUB_REQUESTS: Get all sub-requests for a given request id. For each sub-request it provides request_id, phase,status, developer phase , developer status and completion text.
  • FND_CONCURRENT.Cancel_Request: It cancels a given Concurrent Request.

Tags:
 CONCURRENT PROGRAM, FND_CONCURRENT, FND_CONCURRENT.GET_REQUEST_PRINT_OPTIONS, FND_CONCURRENT.GET_REQUEST_STATUS, FND_CONCURRENT.GET_SUB_REQUESTS, FND_CONCURRENT.SET_COMPLETION_STATUS, FND_CONCURRENT.WAIT_FOR_REQUEST,